
Creating Drum Loops
By Craig Anderton
Sure, there are some great sample CDs available with fabulous drum loops. But it always seems that I want to customize them, or do something like add effects to everything but the kick drum. Fortunately, many CDs also include samples of the individual drums used to create the loops, so you can always stick 'em in your sampler and overdub some variations. But frankly, that process gets pretty tedious, so sometimes it's easier in the long run (and more fun) just to make your own customized drum loops. Here are some tips on drum loop creation using PARIS.
- Collect the drum samples for your loop. In addition to your own samples and sample CDs, there are several program available on the web that can generate various waveforms and drum sounds (one of my favorites is "Stomper," which can synthesize some very cool analog drum sounds). Although the Mac version of PARIS can import .SD2, .WAV, and .PAF files, you will often run into other formats such as AIFF. Peak LE, included with the program, can load AIFF and other file formats, then convert into a form that PARIS can understand.
- Set up a rhythmic reference in your hard disk program. You'll need a "click track" to line up samples rhythmically. PARIS will let you "snap" samples to resolutions as fine as 1/4 notes, much like the snap-to-grid feature in sequencers. However, in many situations you want to be able to snap to finer resolutions, such as 1/16th notes. One solution is to simply record a 1/16th note or 1/8th note metronome track from a drum machine as the first track. Each click gives an obvious visual reference to which you can align samples (Fig. 1).
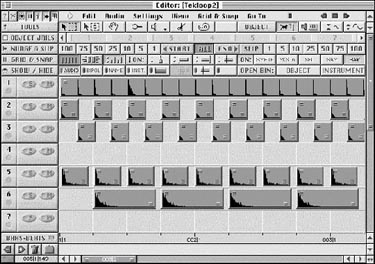
Fig. 1Track 1 provides a 1/8th note visual reference. The kick in track 5 snaps to the 1/4-note grid, the snare in track 6 is on beats 2 and 4, and the high hats in tracks 2 and 3 are lined up with the 1/8th note click. - Import and place samples. Each sound goes on its own track, although sometimes it's helpful to spread the same sound on different tracks if specific sounds need to be
processed or manipulated together.
- Bounce and save. This is the final part of the process, and uses PARIS's bounce to disk option. WaveLab or Peak can then convert the resulting .PAF file into .WAV or .AIFF if needed.
Although you can simply bounce all parts together into a mono or stereo track, also consider bouncing loops of individual drum sounds (snare loop, high hat loop, kick loop, etc.). The advantage of giving each drum sound its own file is that it allows lots of flexibility when creating variation mixes. For example, you can slide a track back and forth a bit in time for "feel factor" applications, or have a main loop with several variation snare drum patterns that you can mute or bring in as needed.
© 1999, Craig Anderton. All Rights Reserved. Used by permission.
By his 22nd birthday, Craig Anderton had recorded three albums with the Philadelphia-based
group "Mandrake Memorial," toured most of the USA, and played at Carnegie Hall. Craig is a
prolific author, having written the classic work Home Recording For Musicians,
several other books, and numerous articles for such magazines as EQ, Guitar Player, Keyboard, Musician, Performing Songwriter, Pro Audio Netherlands, and several others. He
is currently Technology Editor for EQ magazine, Consulting Editor for Guitar Player
magazine, and a monthly columnist for Keyboard.
© 2002 All Rights Reserved E-MU / ENSONIQ