
Sending some channels, but not others, to an exciter opens up several options. For example, with a combination of electronic and acoustic instruments, adding exciter to the acoustic tracks helps them hold their own with the brighter electronic timbres, thus creating a better overall balance. Once you've used an exciter in this somewhat more refined fashion, you'll have a hard time going back to just slapping the thing onto your master outs.
The trick here is to pick a couple of instruments to be emphasized, and bring up a little distortion behind them in the mix. Favorite candidates for this include vocals and drums. I believe this also helps bring back some of the distortion-related aspects of saturating analog magnetic tape, which we associate with "pushing" the sound. PARIS's Super Normalize option can provide similar effects. See the Abnormal Normalization tutorial.
Using distortion for obvious effects à la NIN is one thing; getting a subtle, warming effect takes some work with EQ. PARIS's aux sends are post-EQ, so you can't really adjust the EQ going to the effect independent of the EQ being used on the main channel. Either patch an analog EQ into the signal path, or copy the track to another track, use its EQ, and send the pre-fader signal to the aux send.
Trimming off highs before feeding the distortion gives a smoother, rounder tone, and lets you bring up the distortion higher before it becomes noticeably ugly. Cutting bass is another matter altogether. This produces an extremely brittle, bright high end that is effective if mixed way in the background-treat it like an exciter with an attitude problem, and you should get the levels about right. Experimenting with EQ after the distortion, in particular slightly boosting the lower midrange, is also worth trying.
I generally use distortion effects in mono since I'm not interesting in splattering distortion across the stereo field, but just want to give a little mono buildup for the selected sounds.
- True analog tape sound - not a simulation or "emulation"
- Comparatively inexpensive ($500-$700)
- Ability to provide sounds of different tape types
- Variable tape compression effects, from light to extreme
- Unlimited undo if you decide you didn't get it right the first time
- True stereo processing
First, you need a three-head analog tape deck. This can be anything from a cassette deck to a broadcast-quality two-track. Ever since DAT hit, the price of used two-track reel-to-reel decks has plummeted, so you can probably find one pretty inexpensively.
Fig. 3 shows how to patch the reel-to-reel deck into PARIS; here's the step-by-step procedure.
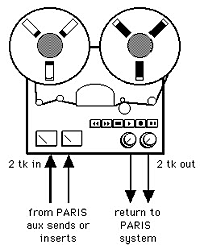
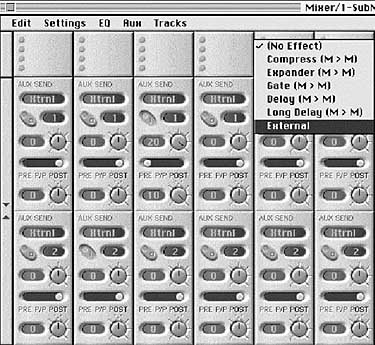
- Set an Aux Out to External, and in the Patch Bay, send the aux outs to a pair of
MEC, 442, or 8-out expander outs.
- Patch these outs to the reel-to-reel recorder inputs.
- Send the reel-to-reel outputs (monitor from the playback head) to two PARIS inputs,
and assign them to the desired mixer channels.
- Set the reel-to-reel to record-ready.
- Load a reel of tape with the preferred sonic characteristics.
- Put the reel-to-reel into record mode, and roll tape.
- Start recording with PARIS. The sounds to be processed play into the reel-to-reel,
while the open tracks record the processed sound.
- Do a trial run and adjust the reel-to-reel input level for the desired amount of
crunch. Remember, you have to monitor from the playback head for this to work.
- After getting the sound you want, rewind to the beginning and transfer the tracks for reel-I mean, real.
We're not done yet, though, because the "crunched" signal will be delayed compared to the original, non-crunched track. No problem: use the "nudge" function to compensate.
Monitor the crunched and non-crunched versions mixed together, then advance the crunched tracks until they line up with the original tracks and you hear no "flamming." Now mute the original tracks, and you'll be left with pure analog tape sound. You need to figure out the appropriate offset only once, unless you change speeds on the reel-to-reel (with my deck, the "nudge factor" was 75 ms).
Not only is this technique simple, it allows your two-track to once more be a productive citizen of your increasingly digitized studio. As a bonus, as long as you keep your original tracks, you can always go back and re-crunch should you decide you crunched too much or too little (this is what I meant by "unlimited undo").
Of course, aux busses have talents other than adding effects, such as setting up custom headphone mixes for different musicians, providing separate feeds to amps you want to mic, and so on.
© 1999, Craig Anderton. All Rights Reserved. Used by permission.
By his 22nd birthday, Craig Anderton had recorded three albums with the Philadelphia-based
group "Mandrake Memorial," toured most of the USA, and played at Carnegie Hall. Craig is a
prolific author, having written the classic work Home Recording For Musicians,
several other books, and numerous articles for such magazines as EQ, Guitar Player, Keyboard, Musician, Performing Songwriter, Pro Audio Netherlands, and several others. He
is currently Technology Editor for EQ magazine, Consulting Editor for Guitar Player
magazine, and a monthly columnist for Keyboard.
© 2002 All Rights Reserved E-MU / ENSONIQ